
small boats -- big fun
User login
Who's online
There are currently 0 users online.
Re-taping keel band
Hello,
First of all a thank you for this invaluable site, very useful info found so far.
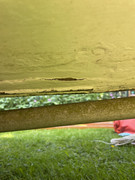
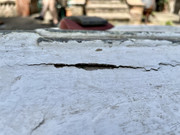
I've just picked up the family Mirror #14494 Poppy, to take her down to Whitstable. She's been in a barn for years, so is in fairly good condition. The only real worry I have is some cracking and lifting of the tape around the centreboard slot on the underside, plus a small puncture/dent in the forward part of the hull.

We last painted and varnished her around 2003, took her to Brittany where someone managed to snap the centreboard when coming into the beach. We got some ply and carried on the holiday, but I suspect the impact combined with her advanced age didn't help. I don't know for sure that she'll leak, but given that I can see bare wood through the crack, I don't want to just drop her in to see or let water deeper into the wooden joints.
I don't have any experience with taping/epoxy, so my question is should I:
a) patch/fill the cracks/dent with something to stop water ingress and hope nothing gets in over this summer's sailing, before doing a better job over winter?
b) strip the keel band and tape right off and re-tape, repaint the area properly?
If a) what product would be best?
If b) is that the correct procedure (band off, clean surfaces, new tape, band back on, paint)?
I imagine the dent would be need to be filled in either case.
The rest of the seams appear to be sound, and I do want to sand her down quite thoroughly at some point in the future. Just need to find some suitable workshop space.
Any advice gratefully received.
PuffinInTegel
Wed, 06/02/2021 - 13:07
Permalink
Welcome ... that looks a bit grim
Hi and welcome to the Forum!
I find the pictures look pretty grim, but if you want to sail this season, you may just get by with cleaning around the damaged areas and retaping them.
The cb-case / hull joint is under strain at all times and if you row, a lot of your weight is transmitted to this because the thwart is just a very thin bit (because of the centreboard slot) which loosens the joint over time and allows rot to set in. I ended up putting a kind of "keelson" in my boat and reinforcing the thwart with a vertical rib under it. Something like that is really an "out of season" job if you have a dry and preferably heated space to work in. I had to do mine at the beginning of the season*.
Wishing you success, whichever way you go!
Cheers,
Gernot H.
See pages 3 to 6 of https://mirrordiscussforum.org/documents/stories/jf2012english.pdf .
curlew
Fri, 06/04/2021 - 18:59
Permalink
Keel Band
I usually find it is best to bite the bullet, get the boat upside down, be brutal ripping off/raking out damaged stuff, then it is very easy with West System epoxy and tape. I always add filler powder to the resin as it gives enormous strength. For pure filling jobs, add loads of filler so it is as stiff as butter.
I have found that temporary jobs are no quicker.
If you find a bit of rot, then I recommend soaking with blue antifreeze for 24 hours, then dry with heat gun.
David
mattigardner
Sat, 06/05/2021 - 16:23
Permalink
Thanks Gernot and David for
Thanks Gernot and David for the tips.
I'm certainly hoping to get brutal on the hull and clear back previous coats of paint, just not right now. I am reading up a lot on epoxy methods and fillers. I think I'll be able to make a reasonable fix to get her watertight and last the summer.
When I do undertake a full strip-back and re-tape the keel band fully, is it worth stripping the other hull tapes if they're looking ok at the moment? Any harm done by replacing them with fresh tape and epoxy, or best left well alone?
Matti
curlew
Mon, 06/07/2021 - 21:25
Permalink
Tapes
If the original tape is polyester then it is supposed to have a finite life and begins to come off. But where it is firm I leave alone. The old tape comes off with a hot air gun quite easily. Polyester and epoxy do not stick together I believe. I have renewed tapes in a few places where they began to fail.
David
Curlew
By the way, sailed Portsmouth - Bembridge Isle of Wight (overnight in marina) - Chichester Harbour at the weekend in my Mirror. Loaded with camping stuff, dry bags on the foredeck even!
mattigardner
Fri, 07/23/2021 - 16:19
Permalink
Success
Just a quick update for those with similar problems. The epoxy and filler worked a treat; made a buttery consistency as advised, quickly applied during one of those hot days in late June and then sanded down and given a fresh coat of paint after a week or so curing. Went for the boat's first sail in about 15 years, no detectable ingress around centreboard slot.
After four hours on the water about an eggcupful made it into the aft tank from a small split in the paint near the skeg. I think this indicates that even where the paint wasn't badly cracked as in the first picture, the original tapes are not stopping water from working its way through. So I'll strip back to have a closer look at all of them over winter.
Will look out for future videos, David. They're an excellent resource and one of the first things I did was add a topping lift. Am working on plans for a camping setup...
PuffinInTegel
Mon, 07/26/2021 - 10:52
Permalink
Good news!
Thanks for the feedback.
It gives me the feeling that we are not just running this site to amuse ourselves. If you do plan on seriously using the Mirror for a few more years, it would be advisable to strip the paint and all loose tapes off the hull and do a thorough overhaul.
I find it annoying sitting on a slightly wet cockpit floor on summer cruises (when it's cooler, I wear a dry suit) and prefer a totally waterproof boat (that's why I've done without self-bailers up to date).
Have fun for the remainder of the season. Are you still in Brittany?
Cheers,
Gernot H.
mattigardner
Fri, 08/13/2021 - 21:11
Permalink
A very useful site indeed.
A very useful site indeed. Unfortunately not in Brittany, that would be a wonderful place to live but it was just a holiday. The boat's in Whitstable, Kent and I've just had a very nice week sailing around the bay. I'll start a thread in the roll-call area with details.
I agree about minor leaks, they're both annoying and worrying that they'll turn into bigger problems later on. I'm just seeking workshop space closer to home in London to to the repairs properly.
One last question (and gratuitous photo of Whitstable's foreshore): now I have a topping lift and like to furl the sail, is there a trick to stop the rear-most batten sitting awkwardly as in the photo? I believe the sail has a slight roach, so the battens are better kept, but am hoping there's a way to make the sail roll nicely. These are the original 1960s battens that are sewn in, so can't be quickly removed.
PuffinInTegel
Sun, 08/15/2021 - 21:19
Permalink
Unfortunately no.
Being a cruising Mirrorist myself, I find the batten annoying too. But the only solution is to remove it.
After finding myself swearing at myself for having forgotten to put it back in before continuing my journey on odd occasions, I've decided to leave it as shown in your picture.
I do relieve all the batten tension but leave them loosely in the sail when I drop everything into the boat for storage though.
Gernot H.
curlew
Mon, 07/26/2021 - 23:43
Permalink
REpairs
Well done, you are going to have a lot of fun with the boat.
david
Curlew
mattigardner
Tue, 10/11/2022 - 19:08
Permalink
Update
A long term update to Poppy's progress. Will be a long post, but it’s useful to have info on repairs for others to find.
She went into storage in a rented garage last November where the stripping back began. Definitely worth doing not only to inspect the 50 year old polyester resin and tape, but also to discover and assess previous damage and repairs. Tape found to be brittle along keel and some of the other hull seams, so all was removed. Found previous hull punctures in forward tank and cockpit floor, both had been fixed with copious amounts of green resin and glass-fibre matting for the larger hole. Weight of stripped paint from the hull alone was over 4kg.
Aimed to get down to bare wood where possible, but the primer was pretty tough on the hull. Also stripped insides of old varnish revealing a nice lighter colour of the wood underneath.
Other repairs:
A bung had been installed in one of the floor battens for draining, but I didn’t trust it (and it not being flush with the floor made it useless for draining). Carved a ply patch from one of the inspection cover cutouts and epoxied in place. Bought two new floor battens to strengthen floor/hull and used a small offcut to plug hole in existing batten. Not an invisible repair, but does the job.
The floor around the daggerboard case was covered in white resin and extra tape to fix old leaks. This was removed and the wood underneath seemed to be sound, so no new tape used on the inner, but care taken to tape the slot on the keel slide.
In replacing the chewed up old bronze screws of the keel band, the new screws protruded into the cockpit here and there. They were the same length as the old ones, so imagine this happens a lot. I couldn’t find any guidance about this, so just added some thickened epoxy on top of the point of each screw to seal and taped over the top once it had set. I wasn’t able to add any along the keel line on the inside of the front tank, but adding epoxy when screwing down seems to have sealed well enough.
Foot rest was unscrewed, a draining hole cut out in the middle, screw holes filled and epoxied back down.
Most of the deck tapes were sound, except for where the transom meets the rear deck, so that strip was replaced.
To finish:
International Compass varnish chosen for its slightly lighter colour. Snow White again used for the hull and initially I had plans for something red too, to replace the red go-faster-stripe and reflect the name. Ran out of time in the end, so hull is all white for now.
Original sails were sent back to Jeckell’s for replacement of cringle grommets, patching a hole, adding openings to the batten pockets and adding reefing to the main. They no longer stock the original Mirror red colour, but I quite like the darker contrast.
Only managed a few days this summer due to work robbing me of free time, but had an end of season sail on Sunday which was beautiful. No more leaking into the stern tank and no new leaks anywhere else.
curlew
Fri, 10/14/2022 - 23:45
Permalink
Poppy
Looks a really nice boat now. I have always had problems with the rubbing band screws leaking. By the way, I have used the product called Stay Afloat on two occasions now to (temporarily) stop bad leaks on Mirrors.
david
PuffinInTegel
Thu, 10/27/2022 - 19:37
Permalink
Great, Congratulations!
You really have put a lot of work into the boat and I'm sure it will pay off in enjoyment. I wouldn't worry about the white hull, lots of boats evolve a livery scheme in the course of their lifetime.
We are extending the season this year, having temperatures around 20° C !